

It always felt to me like it lacked any definition, and was reaaaaalllly boring. So after 6 longs months and countless hours of convincing Hubs that beige (even Ralph Lauren beige) isn't a real color, we finally decided to tackle the living room. Like night and day! I was telling Hubs the other day, it feels like someone just turned on a light!
We decided that in order to create character, as well as some architectural interest, we added a chair rail. We weren't sure what the "official" chair rail height was supposed to be, so we just eyeballed it to the height that looked best (it turned out to be 44 inches). Then we painted the bottom half Valspar's "Ultra White" in a semi-gloss finish, and the top half Martha Stewart's "Heavy Goose" in a flat finish. It was my first time using Martha Stewart paint, and I'm really happy with it. I'll definitely be using it again.
Then we attached 1x4 pine boards to the wall with a nail gun and filled in the nail holes with wood filler and sanded it back to smooth before we painted them white. Originally, we weren't going to use really good wood for the chair rail (we were thinking more along the lines of MDF), and honestly, this was kind of an accident. We went to the lumber yard to try to save some money on the wood, and the guy there assured us that we wanted "clear" wood, which just means is has no knots in it. That sounded good, but we had no idea what he was talking about. He was asking us all kinds of questions and saying all these things that I'd never even heard of. Our response was "uhh, ok. Whatever you think is best..." Seriously, no idea what he was talking about. It looked great on the walls, but not really the way we thought it would, it looked much fancier!
Unfortunately, the walls aren't level and bow in and out in some spots, so putting it up was more difficult than it should've been. Yes, I could've torn down the drywall and fixed it, but we were so close to being done! I couldn't stand the thought of starting over. Between the uneven walls and the great looking wood, we scrapped our original idea of board and batten and just stuck with the chair rail. The wood for the whole room and the hall cost about $50.
I wish these pictures did it justice, but it just FEELS different in the room. It's so much lighter, cleaner...more peaceful.

I really pared down the accessories in the room, I wanted it to feel less cluttered. I only used the items that I absolutely loved, the rest were put away. I got the starfish at one of my favorite antique/cool stuff that you can't find other places store. They were $1 each! The bell is from Marshall's and "Boats" sign is from TJ Maxx. I can't remember exactly how much they were, but they were less than $10 each. I dry brushed the buffet with Martha Stewart's "Driftwood Gray" (it used to be black). I haven't decided whether or not I'm going to sand the edges, I'm really loving the worn look it has now. I'm also really happy with how the fireplace looks now. I know everyone says to not have a whole bunch of pictures on your mantle, but I don't care. I love my pictures, and I think it looks cool. I think especially since they're all black frames, it really looks de-cluttered. The mirror is the same one that was on the fireplace before, just repainted.
 The white chair is the Pottery Barn Charleston chair. Now before you think that Hubs has lost his mind and let me buy a $1000 chair, let me just say that I paid a whopping $30 for it. Yes, you read that right, $30! Craigslist, baby! It's the most comfortable chair on the planet, and probably the best $30 I ever spent.
The other major thing we did was make a dining room area. The living room was certainly big enough, and it was totally unused space before. It also means now I have room in the kitchen for an island/breakfast bar (a project which I haven't tackled yet!). The "Crab Shack" sign is one of my favorite things, it's from Virginia Beach. We were there 2 years ago for my daughter's cheerleading championship, and I saw in the window at night as we were walking down the street. The store was closed, and it was our last night there, so I sighed and resigned myself to the fact that it wouldn't ever be mine. The next day, Hubs made sure we were waiting outside when the store opened and begged the lady to sell it to him (it was the last one). He's pretty awesome like that. The bench and chairs are both from a consignment store, we paid less than $50 for all 3 of them. All I did was paint them and distress the edges. I can't remember the name of the paint, all I know is it's Glidden. I threw away the can and didn't even write the name down. Sorry :(
The table is is from an antique store. It's made from an old church pew from Saluda, South Carolina. We love it, it's the perfect size, not only for the space, but also for the four of us. I love how it's so rustic and simple but so pretty all at the same time.
So there you have it. My new living/dining room! I still have some touch-ups to do, and we're still figuring out what to do with the floor molding, but I love it so much. It's so much better than I'd even imagined! I have to say though, there was no way I could've done all this without my husband's help. He was the muscle behind this one, and he's like a surgeon with a nail gun! (except for when he nails it through pipes in the wall!)

 Those cabinets just make me cringe. The were damp and moldy in some spots, they were just terrible, not to mention there were WAY too few of them. The fluorescent light...ugh. Gross.
 I love me some tacky 80's fruit border! And who in their right mind covers up french doors with mini blinds? If you do that in your house, don't. Mini blinds are bad enough (and yes, I have them in some of my windows still so I'm not being a snob about them), but you just can't cover up french doors like that!
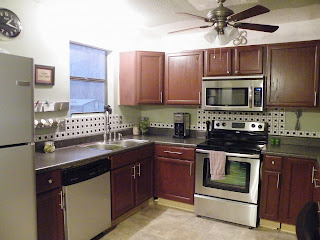


 You can kind of see it in this picture. This wallpaper is from Lowe's, it was about $15 a roll. It's not as thick as I'd like it, but

